 How to test your web site after moving it to the new location, before switching DNS and “going live” there? This situation happens every day, even multiple times a day with single page placeholder sites and huge complicated web portals. I thought I’ll just put together simple instruction to refer people to it instead of explaining it over and over every time.
So, in order to test your web site on the new server, before switching DNS settings to the new location you will need to fool your desktop browser to look into new IP location. Here is how to do it.
On Windows
Locate the HOSTS file on your computer. Typically it is in one of the following locations:
Windows NT/2000/XP/2003/Vista/7 – C:\windows\system32\drivers\etc\hosts
Windows 95/98/Me – C:\windows\hosts
Open this file with a text editor such as Notepad or Wordpad.
Right-click on Notepad and select the option to Run as Administrator – this is important, otherwise you may not be able to open this file.
Then, open the file. Consider performing a “Save As” so you have an original copy of the file that you can restore later. You will see two columns of information, the first containing IP addresses and the second containing host names. By default, a windows hosts file should be similar to the following:
Filename: hosts
|
1 2 3 4 |
# localhost name resolution is handled within DNS itself. # 127.0.0.1 localhost # ::1 localhost # 127.0.0.1 localhost |
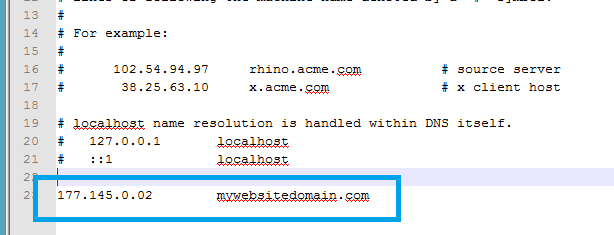
You can add additional lines to this file that will point requests for a particular domain to your new server’s IP address. Example:
|
1 2 3 4 5 6 |
# localhost name resolution is handled within DNS itself. # 127.0.0.1 localhost # ::1 localhost # 127.0.0.1 localhost ############ <Your new IP here> yourwebsite.com www.yourwebsite.com |
Save your changes.
You will have to flush your DNS cache. In Windows, go to Start, and then Run, then type “cmd” and hit enter. Type the following:
|
1 |
ipconfig /flushdns |
Visit your new site using http://yourwebsite.com or http://www.yourwebsite.com/
On MacOS
Open Terminal, which is in Applications->Utilities folder.
You may want to first make a backup copy of your existing hosts file:
|
1 |
sudo cp /private/etc/hosts /private/etc/hosts-orig |
Enter your user password at the prompt.
Type the following command to edit your hosts file:
|
1 |
sudo vi /private/etc/hosts |
Enter your user password at the prompt.
You will see a file with contents similar to the following:
|
1 2 3 4 5 6 7 8 9 10 |
## # Host Database # # localhost is used to configure the loopback interface # when the system is booting. Do not change this entry. ## 127.0.0.1 localhost 255.255.255.255 broadcasthost ::1 localhost fe80::1%lo0 localhost |
Add your domain and IP address to the bottom of the file. For example:
|
1 2 3 4 5 6 7 8 9 10 11 12 13 |
## # Host Database # # localhost is used to configure the loopback interface # when the system is booting. Do not change this entry. ## 127.0.0.1 localhost 255.255.255.255 broadcasthost ::1 localhost fe80::1%lo0 localhost ############ <Your new IP here> yourwebsite.com www.yourwebsite.com |
vi tip:
Press “i” to enter “insert mode” so you can type and copy/paste. Press “Esc” to exit “insert mode” when you are done modifying the file. Type “:wq” to save and quit.
You may also need to grant yourself sudo privileges, if you will get permission error while trying to edit the file. In your “Help” menu, search for “root” and select the instructions for “Enabling the root user.” Follow these.
Restart any currently open browsers. You will also have to flush your DNS cache:
|
1 |
dscacheutil -flushcache |
(There could be some nuances with flushing DNS cache depending on your exact mac OS version but that’s easily googlable)
Now you can visit your new site using http://yourwebsite.com/ or http://www.yourwebsite.com/.
This instruction is based on earlier document by MediaTemple
0 Comments.